15. FAQ & Troubleshooting
Common questions and solutions to help you get the most out of Stone Project.
15.1 Account Issues
I forgot my password
- On the login screen, tap Forgot Password?
- Enter your email address.
- Check your inbox for a password reset link.
- Tap the link and create a new password.
I'm not receiving the verification email
- Check your spam/junk folder.
- Make sure you entered the correct email address.
- Tap Resend Verification Email on the verification screen.
- If using Gmail, check the Promotions or Updates tabs.
- Add noreply@remnantfinderapp.com to your contacts.
I want to change my email address
- Go to Settings > Profile.
- Update the email field.
- You will receive a verification email at the new address.
- Verify the new email to complete the change.
How do I delete my account?
- Go to Settings > Advanced > Delete Account.
- Confirm by entering your password.
- Your account and all associated data will be permanently deleted.
15.2 Piece Listing Issues
My photos are not uploading
- Check your internet connection.
- Ensure the photo file size is under 10 MB.
- Try reducing the photo resolution in your camera settings.
- Close and reopen the app, then try again.
My piece is not appearing in search results
- Make sure the piece status is Available (not Draft or Sold).
- Ensure you have filled in all required fields (title, dimensions).
- Adding a stone type, price, and at least one photo improves discoverability.
- New listings may take a few minutes to appear in search.
- Free plan users: check that you have not exceeded the 20-piece limit.
How do I mark a piece as sold?
- Open the piece's detail page.
- Tap Edit.
- Change the status to Sold.
- Tap Save. The piece will be removed from active marketplace listings but retained in your records.
15.3 Payment & Subscription
How do I upgrade to Pro?
- Go to Settings > Subscription.
- Tap Upgrade to Pro.
- Select a tier and complete the purchase. See Section 11.4 for full details.
Can I get a refund?
Subscription purchases are managed through your app store (Apple App Store or Google Play Store). Refund requests must be submitted through:
- iOS: Apple Support at reportaproblem.apple.com
- Android: Google Play Support
My Pro features disappeared
- Check that your subscription is active in Settings > Subscription.
- Verify in your app store that the subscription has not expired.
- If you recently changed devices, make sure you are logged in with the same account.
- Tap Restore Purchases on the subscription screen.
I was charged but my plan didn't activate
- Close and reopen the app.
- Go to Settings > Subscription and tap Restore Purchases.
- If the issue persists, check your app store purchase history.
- Contact support with your receipt/transaction ID.
15.4 Drawing Tool
The canvas is not responding to touch
- Make sure you are on the correct wizard step (toolbar is only active in steps 1, 2, and 4).
- Try zooming out — you may be zoomed into an area without shapes.
- Tap an empty area to deselect any active shapes.
- If on a tablet, ensure the stylus compatibility setting is correct.
I lost my drawing — can I recover it?
- Drawings auto-save as you work. Reopen the project or quote to find it.
- Check More > Projects for quotes linked to projects.
- Standalone drawings are accessible from the Drawing Tool screen.
Dimensions are showing in the wrong unit
- Go to Settings > Preferences > Units and change to your preferred system (Imperial or Metric).
- Existing drawings will update to reflect the new unit.
How do I add a custom shape?
The Drawing Tool supports Quick Draw templates (Rectangle, L-Shape, U-Shape, Polygon, Ellipse, and Freeform). Use the Freeform or Polygon tools for irregular shapes, or combine multiple shapes on the canvas for complex layouts. You can also save custom shapes to your Shape Library for reuse across projects.
Can I import drawings from CAD software?
Yes. The Drawing Tool imports DXF (AutoCAD R12). In the Drawing Tool top toolbar, tap Import CAD, then AutoCAD DXF (.dxf). On a phone, swipe that bar to the right if you do not see the button. There is no three-dot menu for this. .dwg files are not imported — from AutoCAD, export as DXF R12 first. See Section 4.9 for details.
Can I export drawings for CNC machines?
Yes. Export your drawing as a DXF file (CAD format) from the export dialog. DXF files are compatible with AutoCAD, SolidWorks, Fusion 360, and most CNC/CAM software used in stone fabrication. You can also export as PNG or PDF. See Section 4.14.
How do I use the Shape Library?
Save frequently used countertop shapes to your Shape Library for quick reuse:
- Select shapes on the canvas, then choose Save to Library.
- To insert a saved shape, tap the Shape Library button in the toolbar.
- Browse, search, and organize your shapes into folders.
See Section 4.10 for details.
How do I restore a previous version of my drawing?
Open the Revisions dialog (history icon in the Drawing Tool). You can view all saved revisions with timestamps, author, and change summaries. Tap Restore on any revision to revert to that version. See Section 4.16.
How do I change the font size for dimensions or annotations when exporting?
In the export dialog, enable Include Dimensions or Include Annotations, and a font size slider appears below each option. Adjust dimension font size (6–20) and annotation font size (4–14) before exporting. See Section 4.14 for all export options.
15.5 Measurement
AR Measurement is not available on my device
AR Measurement requires:
- iOS: iPhone 12 Pro or newer with a LiDAR sensor (ARKit).
- Android: An ARCore-compatible device running Android 7.0+. Most modern Samsung, Google Pixel, OnePlus, and Xiaomi devices are supported.
If your device does not meet these requirements, use Photo-Based or Manual measurement instead. The app checks AR compatibility automatically and hides the AR option if your device is not supported.
Photo-Based Measurement gives inaccurate results
- Ensure the reference object is flat on the same surface as the piece.
- Take the photo from directly above (perpendicular to the surface).
- Use good, even lighting without strong shadows.
- The reference object must be fully visible in the frame.
- Try using a different reference object (ruler instead of credit card, for example).
Can I re-measure an existing piece?
Yes. Open the piece and tap Edit > Update Dimensions. You can re-measure using any method and the piece listing will update.
15.6 Notifications
I'm not receiving push notifications
- Check that notifications are enabled on your device:
- iOS: Settings > Stone Project > Notifications > Allow Notifications
- Android: Settings > Apps > Stone Project > Notifications > Enable
- Check in-app notification settings: Settings > Notifications.
- Make sure Quiet Hours are not active.
- Ensure the app has not been force-stopped or battery-optimized away.
Too many notifications
- Go to Settings > Notifications.
- Disable categories you don't need.
- Set Quiet Hours to suppress notifications during off-hours.
15.7 QuickBooks Integration
QuickBooks sync failed
- Check that your QuickBooks connection is still active in Settings > Integrations > QuickBooks.
- If the connection expired, tap Reconnect and re-authorize.
- View the Sync History to see specific error details.
- Failed exports are retried automatically every hour. You can also retry manually.
Data is different between Stone Project and QuickBooks
- Sync is not instant — data updates every 15 minutes.
- If you made changes directly in QuickBooks, allow time for the next auto-sync cycle.
- For immediate sync, go to QuickBooks settings and tap Sync Now.
15.8 Client Portal
How do my clients access the portal?
Clients receive portal access automatically when you send them a quote or invoice. They can also be invited manually from the client profile. Clients log in via magic link (email), Google, Apple, or password.
Can I customize the portal appearance?
Yes. Go to Settings > Company > Portal Settings to configure your portal subdomain, upload your logo, and set brand colors. The portal uses your company branding for a professional experience.
What can clients do in the portal?
Clients can view their projects, approve/reject quotes, view and pay invoices, send messages, and download shared files. See Integrations > Client Portal for full details.
15.9 Offline Mode & Data Sync
Some data is missing when I'm offline
Stone Project caches essential data for offline use, including your pieces, clients, and projects. However, some features require an internet connection:
- Searching the marketplace
- Sending quotes and invoices
- Processing payments
- Syncing with QuickBooks
When you go back online, any pending changes sync automatically.
My changes didn't save
- Check your internet connection. If you were offline when making changes, they should sync when you reconnect.
- If the issue persists, try pulling down to refresh the screen.
- As a last resort, go to Settings > Advanced > Clear Cache and log in again.
15.10 Pro Features & Paywall
I see a "Pro Required" popup
Some features are exclusive to the Pro plan. When you try to access a Pro-only feature on the Free plan, the app shows a paywall screen explaining the feature and offering an upgrade option.
Pro-only features include: CRM, Drawing Tool, Quotes, Invoicing, Calendar, Analytics, Integrations, Floor Plan Editor, Group Conversations, Live Feed, Time Clock Review, Financial Visibility, and Affiliate Program. See Subscription Plans for the full comparison.
I upgraded but still see the paywall
- Close and reopen the app completely.
- Go to Settings > Subscription > Restore Purchases.
- If the issue persists, wait a few minutes for the app stores to process the purchase.
- Contact support if the problem continues.
15.11 Time Clock
Team members' time clock entries are wrong
Managers can correct time entries from the Time Clock Review screen:
- Go to More > Reports > Time Clock Review.
- Find the entry that needs correction.
- Tap to edit the start time, end time, or add a note.
- Approve or reject the entry.
I clocked in at the wrong time
If you clocked in early or late, you can add a reason when prompted. Your manager can also adjust the entry from the Time Clock Review screen.
15.12 Floor Plan & Facilities
Can I have more than one company under the same login?
Yes. Someone can invite you to their team, or you can create another company yourself from Settings → Create new company. Create a second company only for a separate legal entity; two locations of the same business are facilities. When you belong to more than one, tap the company name at the top of the Dashboard to switch. Each company has its own inventory, clients, quotes, team and subscription — nothing crosses over. The 14-day Pro trial is only on the first company you own. See Company Management > Account, Companies and Facilities.
What is the difference between a company and a facility?
A company is the business: its own clients, pricing, team, invoices and plan. A facility is a location inside that same company — a warehouse, showroom or shop. Facilities share everything with the company; they only record where material and crews are, and let you filter lists by location. Two yards of the same business are facilities; a separate legal entity with its own billing is a separate company.
Why do I only see pieces from one location?
The sidebar has an Active Facility selector (it appears once you have two or more facilities). If a facility is selected, lists show that location only — pick All facilities to see everything. If it is already on All facilities, your team member account may be limited to specific facilities; ask an admin to check your facility access.
I can't see the satellite background in the Floor Plan
- Ensure your facility has a valid address with GPS coordinates. Go to Settings > Facilities, edit the facility, and verify the address is geocoded correctly.
- Satellite imagery requires an internet connection.
How do I assign a piece to a rack?
Open the Floor Plan Editor for your facility, then drag the piece from the Pieces Panel (right side) onto the desired rack on the canvas. See Managing Pieces > Floor Plan Editor for details.
15.13 Team Map
How do I see where my team members are?
Go to the Team screen and tap the Map icon in the app bar (or select Team Map from the menu). The map shows all team members who have shared their location. See Company Management > Team Map for details.
Is my location tracked all the time?
No. Location sharing only happens while the Team Map screen is open. When you close the screen, sharing stops immediately. The map shows the last known location for members who have previously used the feature.
15.14 Group Conversations
How do I create a group conversation?
Go to Messages, tap the + icon, select Group, add participants, set a name, and tap Create. See Communication > Group Conversations for full details.
Can I archive a conversation?
Yes. Swipe left on any conversation in the Messages list and tap Archive. Archived conversations can be restored from the Archive section. See Communication > Archived Conversations.
15.15 Affiliate Program
How does the Affiliate Program work?
Share your unique referral link with other fabricators. When someone signs up using your link and upgrades to Pro, you earn a commission. Track your referrals, earnings, and payouts from the Affiliate Dashboard (More > Affiliate Program). See Company Management > Affiliate Program for details.
Where do I find my referral link?
Go to More > Affiliate Program. Your unique referral link is displayed at the top of the Affiliate Dashboard. Tap Copy to copy it to your clipboard.
15.16 Contact Support
How do I get help inside the app?
Use the Concierge. Move your pointer to the right edge of the window and click the Concierge handle — it is on every screen, so you never have to go looking for it.
It opens on the Chat tab, where you can ask an AI assistant in plain language. It can answer, walk you through a workflow, take you straight to the right screen, and open a support ticket for you if it cannot solve the problem. The Open and Closed tabs next to it hold your tickets.
To raise a ticket yourself, tap New Ticket, pick a type, and describe the problem in the What happened? field. That is the whole form — the subject, priority, and which part of the app is involved are worked out for you.
You do not need to describe your screen
Opening the Concierge automatically captures a screenshot of the screen you were on, plus your app version and the part of the app you were using. Use Capture screen on the ticket to attach it. The screenshot icon in the header minimizes your draft so you can go grab another screen and come back — everything you typed is still there.
See Communication > Getting Help Inside the App for the full walkthrough.
Can I still reach support by email?
Yes — write to support@stoneproject.app. A ticket raised through the Concierge is faster, because it arrives with your screenshot, app version, and account details already attached.
- Response Time:
- Free plan: within 48 hours
- Pro plan: within 24 hours (priority support)
If you do email, please include:
- Your account email
- Device type and OS version
- App version (found in Settings > About)
- Screenshots or screen recordings of the issue
- Steps to reproduce the problem
15.17 Quotes, Orders & Invoices
What's the difference between a Quote, an Order and an Invoice?
They are three stages of the same job:
| Document | What it is |
|---|---|
| Quote | A price you are proposing. Nothing is committed — you can revise it as much as you like |
| Order | The accepted job. Created from a quote once the client says yes; this is what you fabricate and schedule against, and where deposits and payments are tracked |
| Invoice | The bill. Generated from the order when it is time to collect |
The normal path is quote → order → invoice, and you rarely create an order or invoice from scratch. See Orders & Deposits for how an order is created from a quote, and Generating the Invoice.
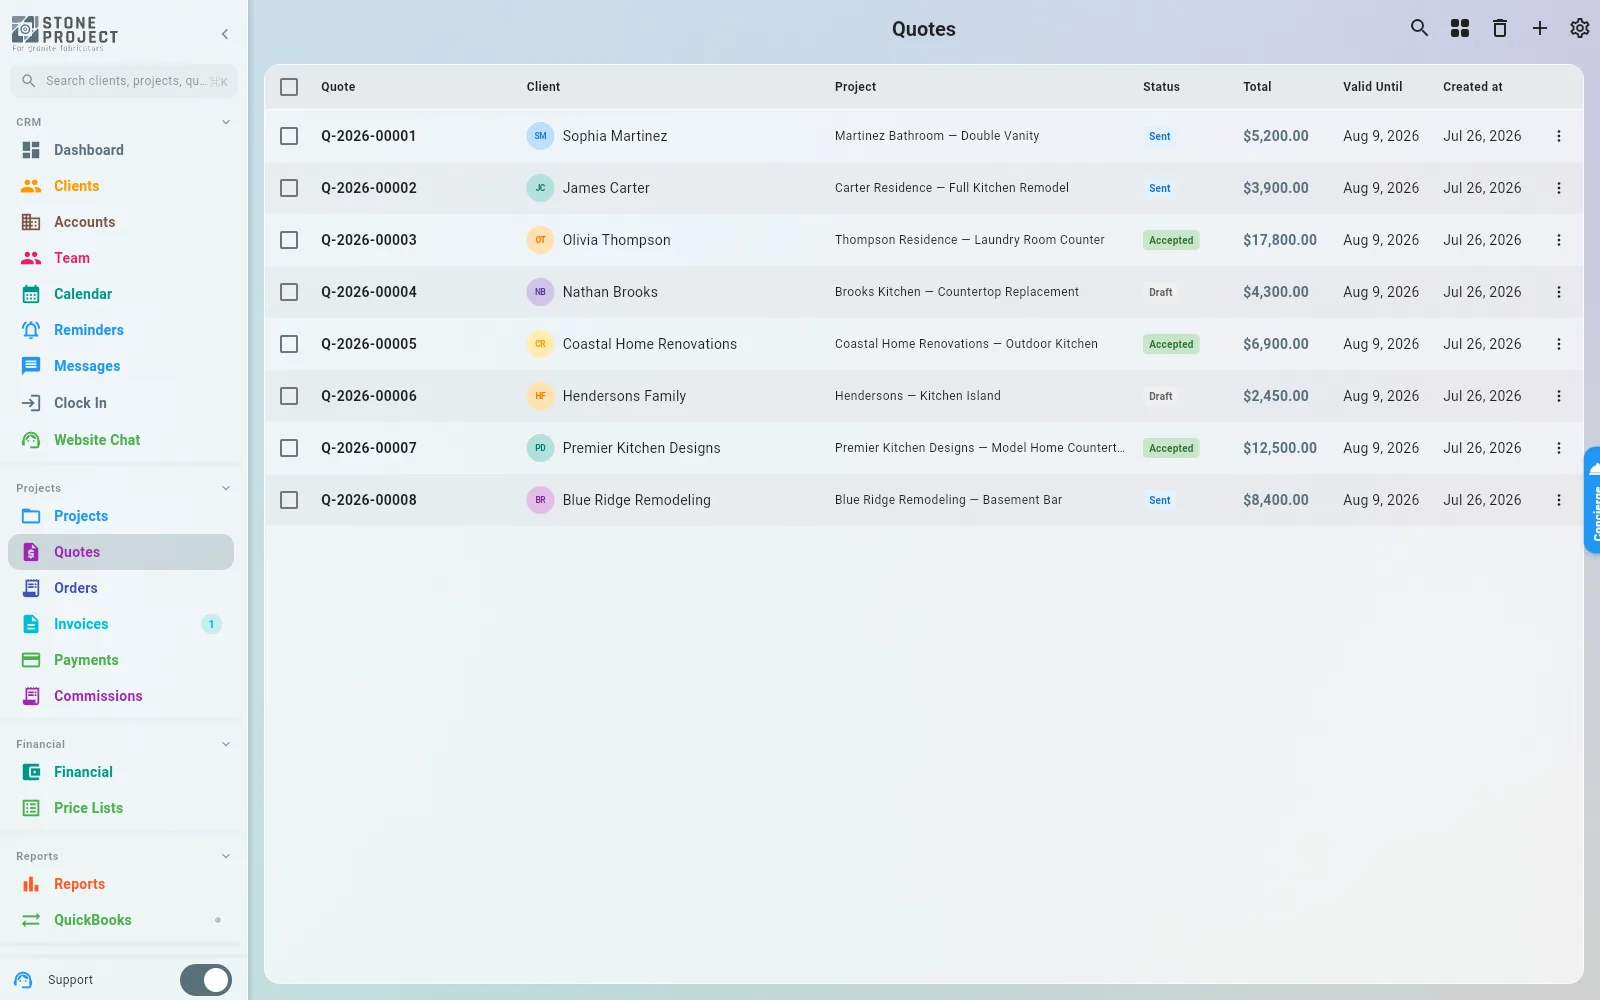
I changed a price but my old quote still shows the old number
That is deliberate. Every quote remembers the price list revision it was built from, so a quote you already sent cannot change under the client's feet.
To bring it up to date, reopen the price details for that project. A Prices Out of Date dialog appears listing every price that moved, shown as old → new. Tick the ones you want to adopt and tap Apply Selected Updates — anything you untick is locked onto the quote at the old price.
See Price Lists > When a Quote's Prices Go Stale, and Revisions and Revision History to see exactly what changed and when.
We don't take jobs under $650 — how do I set a minimum?
Do not inflate the material price and do not type a fake line every time. Set the shop floor once:
- Go to More > Financial > Price Lists, open any list, then the Settings tab.
- Under Minimum Charges, tap Minimum Job Charge and enter
650(or your number).
The next quote that lands below that floor gets the difference added as its own line named Minimum Job Charge. See Price Lists > Minimum Job Charge.
15.18 Clients & Accounts
What's the difference between a Client and an Account?
A client is who you bill for one job. An account is the company behind many of them — a builder, a kitchen dealer, a designer who keeps sending you work.
Use a client on its own for a homeowner. Create an account when the same business keeps coming back and you want its jobs, revenue, and contacts rolled up in one place. Clients are then linked to the account, and you can still bill each job to its own client.
See Accounts: Builders & Dealers for the full comparison and when to create one.
I found the tax rate tab but I can't click it
People ask this as: "encontrei a aba de colocar o tax rate mas não estou conseguindo clicar."
If you found the tax rate tab on the account (Default Tax Rate) and you cannot click it — the dropdown will not open — look one row up: Tax Exempt is on. An exempt account never charges sales tax, so picking a rate would do nothing. Turn Tax Exempt off (the switch just above the field) and the Default Tax Rate dropdown unlocks. Disabled because this account is marked Tax Exempt.
How do I set a different tax rate per state on the same price list?
Do not duplicate the price list per state. On each account, set Default Tax Rate to that state's rate (Massachusetts 6.25, Connecticut 6.35, Rhode Island 7). It takes priority over the price list rate. Leave the field blank on accounts that should keep using the list's rate.
See Accounts > Pricing & Terms.
Can I change the order of the price groups?
Yes. Open the price list, go to the Materials tab, pick the brand, and drag the handle on the left of each group. New subgroups no longer have to sit at the bottom. See Price Lists > Reordering Price Groups.
15.19 Purchasing & Receiving
I marked a purchase order as received but the slabs aren't in inventory
The status alone does not create stock. Inventory is created by the Receive Items step, line by line.
- Open the purchase order and tap Receive Items. (The action is only available once the PO is Sent, Confirmed, or Partially Received — never on a Draft.)
- Enter the quantity that actually arrived on each line.
- Tap Record Receiving.
One inventory piece is created per unit received — ten slabs means ten pieces, each with its own barcode — and the PO's status then updates itself to Partially Received or Received. See Purchasing > Receiving Items into Inventory.
15.20 Deleting & Recovering
I deleted something by mistake
Almost nothing is erased outright — deleting moves the record to the Trash, where you can put it back.
Go to Settings > Trash. There is a tab for each kind of record the Trash covers: pieces, clients, projects, quotes, orders, invoices, payments, purchase orders, purchase requisitions, vendor bills, tasks, contracts, and label templates.
- Open the tab for what you lost.
- Narrow it down with the search box, the period chips (Today, Last 7 days, Last 30 days, All time), or by sorting Newest, Oldest, or by Name. Each row shows when it was deleted and who deleted it.
- Tap Restore and confirm.
Several list screens — clients, projects, quotes — also have a Trash entry in their ⋮ menu that opens the Trash straight on the matching tab.
15.21 Website, Portal & Reviews
My website isn't showing — I published it
Your public website and your client portal are two different things that share the same web address, so it is easy to confuse them. The website is the marketing site anyone can browse; the portal is the private area your clients log into to approve quotes and pay invoices.
If the site is not live, check in this order:
- Go to Settings > My Website. The status card at the top reads Live or Offline. Make sure the Publish switch is on.
- Publishing is not the only condition — your company account also has to be active and approved. Until approval comes through, the switch can be on while the status card still says offline.
- Check the address itself on the same screen. Tap the open icon next to it to load your site in a new tab, or the copy icon to grab the link.
- Check which pages are switched on. Home is always on; the rest — inventory, materials, gallery, reviews, about, services, contact, locations — each have their own switch.
See Your Public Website for the full setup, and Integrations > Client Portal for the portal.
A review isn't showing publicly
New reviews are held for moderation before anyone sees them.
- Go to Settings > Client Reviews.
- Open the Pending tab. Reviews waiting on you carry a Pending moderation banner.
- Tap Approve — or Reject if you do not want it published. Approved reviews can also be marked as featured.
If an approved review still is not appearing on your site, open Review Settings and check that the public widget is enabled. See Customer Reviews.
15.22 Promo Codes
How do I redeem a promo code?
A promo code arrives as a link. Open it while you are signed in and the app shows you the offer before you commit — the campaign name, what it includes, and how long it runs. Tap Redeem Now and you are taken back to the Dashboard with the plan applied.
If it does not go through, the screen tells you why: the code is not valid, it has expired, it has been fully used, you have already redeemed it, it has been switched off, or it does not apply to your plan.