12. Settings & Preferences
Customize Stone Project to fit your workflow.
Access: Tap More > Settings.
12.1 Profile Settings
Manage your personal account information:
| Setting | Description |
|---|---|
| Name | Your display name |
| Account email (used for login) | |
| Phone | Contact phone number |
| Avatar | Profile photo |
| Password | Change your password |
To update:
- Go to Settings > Profile.
- Edit the desired fields.
- Tap Save.
12.2 Notification Preferences
Control how and when you receive notifications:
- Go to Settings > Notifications.
- Configure per category:
| Category | Push | In-App | |
|---|---|---|---|
| Messages | Toggle | Toggle | -- |
| Marketplace Activity | Toggle | Toggle | -- |
| Projects (Pro) | Toggle | Toggle | Toggle |
| Billing (Pro) | Toggle | Toggle | Toggle |
| Calendar Reminders (Pro) | Toggle | Toggle | -- |
| Time Clock (Pro) | Toggle | Toggle | -- |
| Live Feed (Pro) | Toggle | Toggle | -- |
| System Updates | Toggle | Toggle | Toggle |
- Set Quiet Hours (e.g., 10 PM to 7 AM) to suppress push notifications.
12.3 Theme (Light/Dark Mode)
Choose your preferred visual theme:
- Go to Settings > Appearance.
- Select:
- Light — White background, dark text
- Dark — Dark background, light text
- System — Follows your device's system setting
12.4 Language
Switch the app language:
- Go to Settings > Language.
- Select:
- English (US)
- Portuguese (BR)
- Spanish (ES)
- Italian (IT)
- The app restarts with the selected language.
12.5 Units of Measurement
Choose your preferred unit system:
- Go to Settings > Preferences > Units.
- Select:
- Imperial — Inches, square feet
- Metric — Centimeters, square meters
This affects all dimension displays, the drawing tool, measurement tools, and price-per-area calculations.
Price typing — "I type 200 and it becomes 2.00"
Two ways of typing money exist, and the shop decides which one suits it:
| Mode | What typing 20010 gives you |
Who it suits |
|---|---|---|
| Cents first (2500 = 25.00) | 200.10 |
Whoever enters prices with cents all day and does not want to hunt for the decimal point |
| As typed (25 = 25.00) | 20,010.00 — and typing 200 gives 200.00 |
Whoever enters round dollars and reads the digits literally |
Change it in Settings > Preferences > Units & Currency > Price typing, then reload the page.
It is one person's setting, not the company's
Price typing belongs to the user account, so switching it changes it for you only — the tile carries the Only you chip. Everyone who wants the other mode has to set their own, and a new team member starts on Cents first. On a shop where the whole team wants "As typed", set it once per person as they are added; there is no company-wide default to flip.
12.6 Quote PDF Customization (Pro)
Customize the look of your generated quote PDFs:
- Go to Settings > Drawing & Documents > PDF Settings.
- Configure:
| Option | Description |
|---|---|
| Company Logo | Appears in the header of the PDF |
| Company Info | Address, phone, email displayed on the quote |
| Header Color | Brand color for the PDF header |
| Terms & Conditions | Default text appended to every quote |
| Footer Text | Custom footer (e.g., "Thank you for your business!") |
| Show Drawing | Include the countertop layout drawing in the PDF |
| Show Dimensions | Print the measurements on the drawing |
| Show Slab Layout | Add a page showing the slabs applied to the drawing |
| Show Quantities | Print sq ft / lin ft on the line items |
| Signature Line | Add signature and date fields at the end of the PDF |
| Pricing Mode | Detailed, per area or total only |
| Show Itemized Pricing | Show or hide the line-by-line breakdown |
| Default Show Price Details | Whether new quotes default to showing or hiding price details |
- Tap Preview to see how the PDF will look.
- Tap Save.
The Send email window starts from here
PDF Settings is your default print template. Every time you send or export a quote, the boxes (Include Drawing, Show Dimensions, Include Slab Layout, Show Quantities, Signature Line, Pricing Mode) start the way you saved them here, and that template's chip under Quick Presets starts selected. Unticking a box in the Send email window changes only that send. With several templates in Settings > Drawing & Documents > Print Templates, use ⋮ > Set as default to pick which one the window starts from.
These are defaults, not a retro-edit
Everything on this screen is applied when a drawing or a quote is created. Changing a default here never rewrites a quote that already exists — the one on your screen keeps whatever it was born with. To change an existing job, use the same control in the options bar above the price details of that drawing and generate the quote again.
12.7 Email Templates (Pro)
Customize email templates used when sending quotes and invoices:
- Go to Settings > Email Templates.
- Select a template to edit:
- Quote Email — Sent when sharing a quote with a client
- Invoice Email — Sent when emailing an invoice
- Reminder Email — Sent for overdue invoice reminders
- Edit the subject line and body text.
- Use placeholders for dynamic content:
{client_name}— Client's name{project_name}— Project name{amount}— Total amount{due_date}— Payment due date{company_name}— Your company name- Tap Save.
12.8 Workflow Designer (Pro)
Customize your project workflow stages:
- Go to Settings > Workflow Designer — it sits in the Operations block of Settings, and it is where the Kanban stages live. (In Spanish: Ajustes → Operaciones → Diseñador de Flujo de Trabajo.)
- Manage stages:
- Add a new stage
- Rename existing stages
- Reorder stages by dragging
- Set colors for each stage
- Delete unused stages
- Tap Save.
Default stages: Lead → Design → Quoted → Approved → Production → Installation → Completed.
12.9 Invoice Settings (Pro)
Configure default settings for your invoices:
- Go to Settings > Invoice Settings.
- Configure:
| Setting | Description |
|---|---|
| Invoice Prefix | Prefix for auto-generated invoice numbers |
| Default Notes | Default notes appended to every invoice |
| Payment Terms | Default payment terms (e.g., Net 30) |
| Default Tax Rate | Tax rate automatically applied to new invoices |
- Tap Save.
12.10 Calendar & Work Hours Settings (Pro)
Configure your calendar and team availability:
- Go to Settings > Calendar Settings.
- Configure:
| Setting | Description |
|---|---|
| Work Hours | Start and end times for each day of the week |
| Work Days | Which days your shop is open |
| Time Zone | Your company's time zone |
| Slot Duration | Default event duration (30 min, 1 hour, etc.) |
Team Members' Schedules
Individual team members can have their own work hour settings. Go to Company > Team > member profile > Schedule to set per-member availability.
12.11 Financial Visibility (Pro)
Pro Feature
Financial Visibility settings require a Pro subscription.
Control which team members can see financial data (prices, margins, totals) across the app.
- Go to Settings > Financial Visibility.
- Configure visibility rules per role or per team member:
| Data Type | Who Can See by Default |
|---|---|
| Quote Totals | Owner, Admin, Sales |
| Invoice Amounts | Owner, Admin |
| Profit Margins | Owner only |
| Material Costs | Owner, Admin, Sales |
| Commission Data | Owner, Admin |
- Adjust as needed and tap Save.
When financial data is hidden for a team member, those fields appear as "---" in project, quote, and invoice screens. This is useful for installer or fabrication teams who need project details without pricing information.
12.12 Advanced Settings
Additional configuration options:
| Setting | Description |
|---|---|
| Cache | Clear local cache to free up storage |
| Delete Account | Permanently delete your account and all data |
| Default Tax Rate | Set the tax rate applied to new invoices |
| Price Library | Your rate card for materials and services — now managed as Price Lists, and used to auto-populate quotes |
| Delivery Settings | Configure delivery zones and fees |
| Project Checklists | Create reusable checklist templates |
| Job Workflow | Configure job types and default settings |
| DXF Settings | Configure DXF export preferences (layers, units) |
Price Library
Your standard pricing — material per square foot, edge profiles per linear foot, cutouts, fabrication, installation, delivery — lives in Price Lists, under Settings > Price Lists. Those prices are what quotes are built from, so a quote written tomorrow picks up a price you change today without anyone retyping anything.
Price Lists are a chapter of their own, covering multiple rate cards (retail, wholesale, builder), revisions, and how existing quotes flag as out of date: see Price Lists & Pricing Tiers.
DXF Export Settings
Configure how DXF files are exported from the Drawing Tool:
- Go to Settings > Drawing Settings > DXF Settings.
- Configure:
- Include layers — Separate shapes, cutouts, and dimensions into DXF layers.
- Unit system — Inches or millimeters for DXF export.
- Tap Save.
12.13 Catalog & Standards
The values everyone in your shop picks from a dropdown — finishes, thicknesses, slab sizes — are defined here, so a salesperson and a fabricator never enter the same thing two different ways.
Most of these screens follow the same pattern: a System Defaults section that is read-only and shared by every company, and a Company Custom section on top of it that only your shop sees. You add to the defaults; you do not edit them.
Finishes
Settings > Finishes.
The eight standard finishes (Polished, Honed, and so on) are always there and cannot be changed. Tap + to add your own — a name is all it needs. Custom finishes can be renamed or deleted with the icons on their row. The same list feeds the Finish dropdown everywhere in the app, including the materials pricing tab.
Renaming a finish is safe, deleting is not
Renaming only changes the label; anything already using that finish keeps working. Deleting a custom finish removes it from the dropdown, so materials that referenced it lose the value.
Standard Measurements
Settings > Standard Measurements. Two tabs.
| Tab | What you define |
|---|---|
| Thickness | A slab thickness, entered in centimeters — the inches value fills in automatically |
| Slab Size | A standard slab length × width, with both a metric and an imperial pair of fields |
Each entry also carries its own display labels for metric and imperial, so you can show "2 cm" to one crew and 3/4" to another rather than a raw converted decimal.
The Load Defaults button in the header adds the full set of industry-standard measurements to your company in one go. It does not duplicate anything you already have, so it is safe to run on an established shop.
Drawing Line Styles
Settings > Drawing Line Styles.
Controls how each kind of edge is drawn on countertop layouts, grouped into Finished Edges, Unfinished / Feature Edges and Reference Lines. A legend card at the top previews the whole set as it will appear on a drawing.
Tap any style to edit it:
| Property | Options |
|---|---|
| Color | A palette of 21 preset colors |
| Line pattern | Solid, dashed, dotted, or dash-dot |
| Stroke width | How heavy the line is drawn |
The dialog previews the line live as you change it. Reset to Defaults in the header puts every style back.
Make the drawing readable across the shop floor
The point of these styles is that someone can glance at a printed layout and see instantly which edges are finished. Pick one strong solid color for finished edges and keep unfinished edges dashed — do not make every style a different shade of the same color.
12.14 Boards & Tables
Two screens control what your team actually sees on the project board and the project list. Both preview your changes live as you make them.
Kanban Card Designer
Reached from the Kanban card's menu on your Dashboard > Customize Cards.
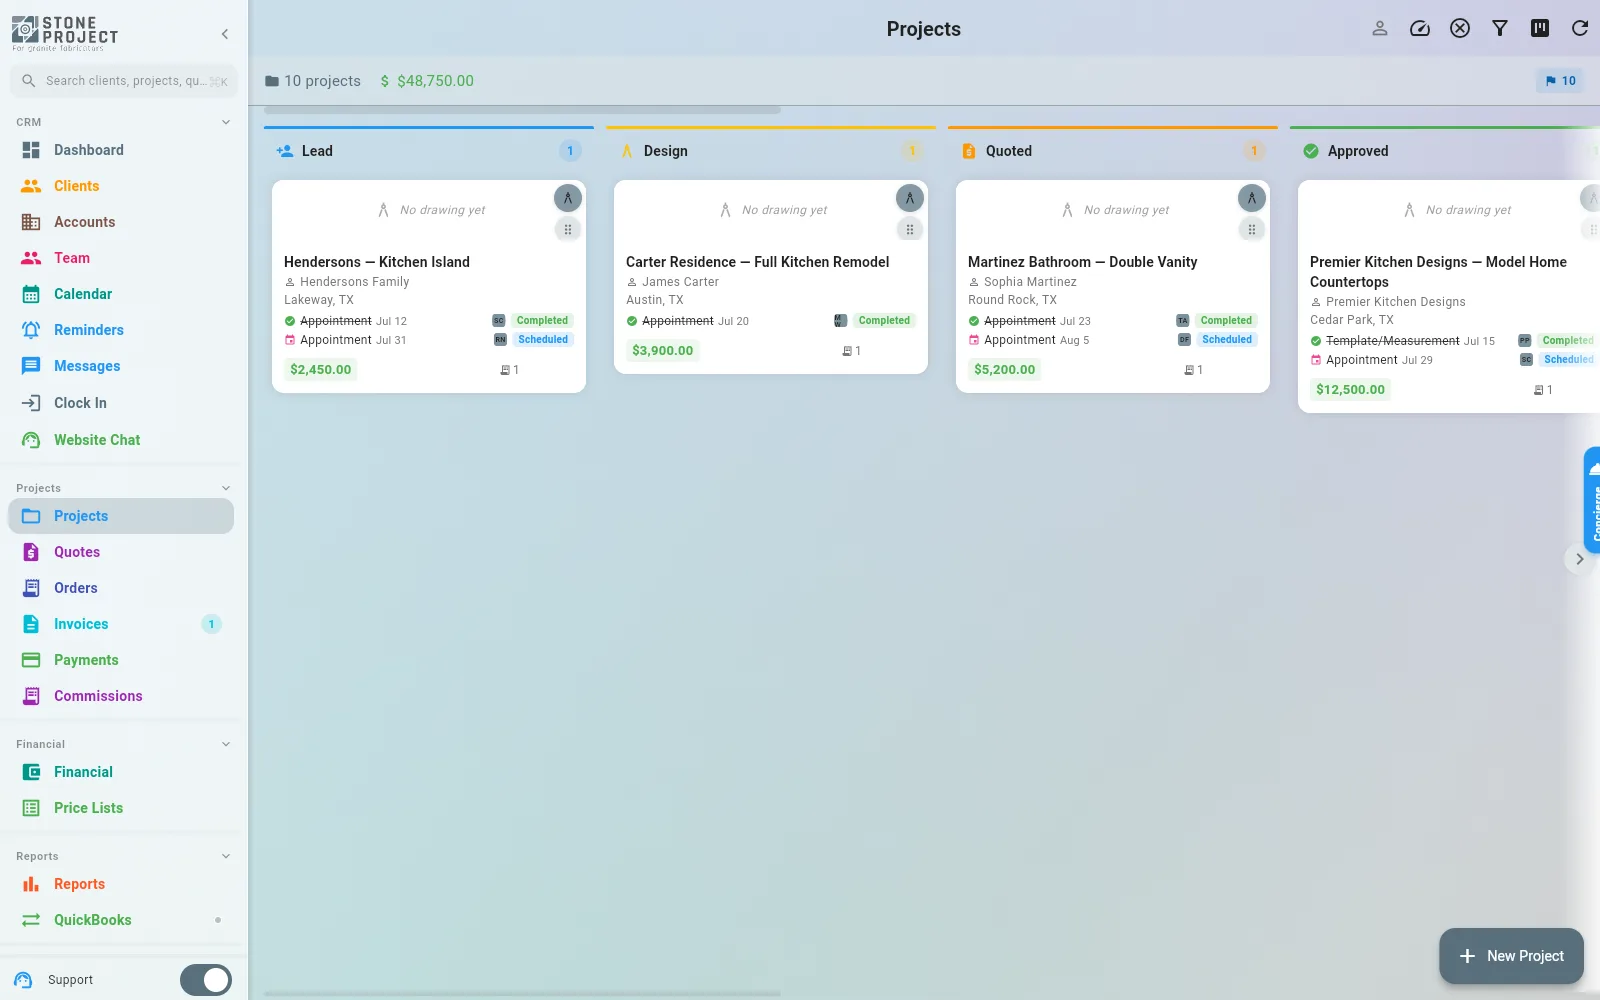
A project card is split into four zones. For each zone you choose which fields appear and in what order:
| Zone | Typically holds |
|---|---|
| Thumbnail | The project image |
| Header | Name, code, client, bill-to account, location |
| Activities | The scheduled work on the card |
| Footer | Value, days in stage, deadline, counts, pending tasks, checklist |
- Toggle a field off with the switch on its row — it disappears from every card.
- Drag a field by its handle to reorder it within its zone.
- Reset to Defaults puts the field layout back.
Most fields also have a palette icon that opens a style editor for that field:
| Style setting | Options |
|---|---|
| Font size | Default, Small, Large, X-Large, Huge |
| Font weight | Field default, Normal, Medium, Semibold, Bold |
| Font color | Any color, or cleared to follow the theme |
| Background color | Any color, or cleared for no highlight |
A sample card at the top of the screen redraws with every change, so you can see the result before you leave.
Field layout is yours; styling is the company's
Which fields you show and their order is a personal preference — it follows your login and does not affect anyone else. Font sizes, weights and colors are company-wide and only an administrator can change them. Non-admins see the palette icon disabled. Reset styles in the header clears every field's styling for the whole company.
Project Table Columns
Settings > Preferences > Customize columns.
The same idea for the project list view: every available column on a list you can reorder by dragging, and switch on or off individually. A live preview at the top shows three of your real projects rendered with the current column set, so you can judge the width before committing.
Reset to Defaults restores the original order and visibility. If you switch every column off, the preview warns you that nothing is visible.
12.15 Trash
Settings > Trash.
Almost nothing in the app is deleted outright — it is moved to the Trash first. The Trash is organized as one tab per record type, each with a badge showing how many deleted items are waiting in it:
| Pieces | Clients | Projects |
| Quotes | Orders | Invoices |
| Payments | Purchase Orders | Purchase Requisitions |
| Vendor Bills | Tasks | Contracts |
| Label Templates |
Within a tab you can:
- Search by name or number.
- Filter by period — Today, Last 7 Days, Last 30 Days, or All time.
- Filter by who deleted it — one chip per team member who has deleted something of that type.
- Sort by Newest, Oldest, or Name.
Each row shows the item, how long ago it was deleted, and who deleted it. The restore icon on the right brings it back after a confirmation.
The 'who deleted this' filter answers the argument
When something disappears and nobody knows why, open the right tab and filter by person. The Trash records who deleted each item and when, which is usually faster than asking around.
12.16 Shop Configuration
The settings that describe how your particular shop runs.
Departments
Settings > Departments.
A department groups people and the work they are allowed to do. For each one you set a name and description, then:
- Members — which team members belong to it.
- Roles — a label for the roles that work in this department. It does not grant or remove any permission.
- Activity types — which kinds of scheduled work this department performs.
- Photo and justification requirements — whether its activities must carry a photo, and whether a reason is required.
Same permissions for a whole department
Permissions belong to each person, not to the department. To give everyone in a department the same access (for example, inventory editing without seeing prices), set up one member's permissions first, then on the Team screen open that member's ⋮ menu and choose Apply Permissions to Department. Their permissions are copied to every other member of the department. Owners, and admins when you are not the owner, are skipped.
Discount Presets
Settings > Discounts.
Reusable discounts your team applies to a quote with one tap, instead of retyping a number and hoping it is the agreed one.
| Field | Notes |
|---|---|
| Name | What the salesperson will see in the list |
| Type | Fixed amount, or percentage |
| Value | The amount or the percentage |
| Active | Inactive presets stop appearing without being deleted |
Document Numbering
Settings > Document Numbering. Requires the company-edit permission.
Sets the sequence your documents are numbered from. Quotes, orders, invoices and payment receipts use a fixed format with the year built in; you set the number the sequence starts from:
| Document | Format |
|---|---|
| Quotes | Q-YEAR-NUMBER |
| Orders | O-YEAR-NUMBER |
| Invoices | INV-YEAR-NUMBER |
| Payments | PAY-YEAR-NUMBER |
Projects are the exception — you set both the prefix (up to 10 letters or digits, P by default) and the starting number, giving codes like P-00001.
Each field shows the next number that will actually be issued, and a preview of the format as you type. You cannot set a starting number below the next number already in use.
The starting number is not a renumbering tool
It applies only when there are no documents yet for the current year, or when the next sequential number would otherwise fall below what you configured. Setting it does not renumber documents that already exist.
Account Types
Settings > Account Types. Custom types for classifying your accounts, on top of the built-in ones.
Holiday Messages
Settings > Calendar Settings > Holiday Messages.
Mark specific dates as holidays and attach a custom quote message to each, with a background and text color for how it displays. Useful for telling clients "closed the week of the 4th, quotes resume Monday" without anyone remembering to say it.
Inventory Settings
Settings > Inventory Settings. Requires the company-edit permission.
Defines the piece statuses your inventory uses, beyond the built-in ones. Statuses can be dragged into the order you want them to appear, and switched active or inactive without deleting them. Adding one asks for:
| Field | Notes |
|---|---|
| Status name | What it is called in the app |
| Color | A palette swatch, so it reads at a glance on a card |
| Icon | Chosen from the available set |
| Show in Shop | Whether pieces in this status are visible to customers |
System statuses can be reordered and deactivated but not deleted.
Owners also see the requisition workflow switches at the top of this screen: whether purchase requisitions require approval at all, and whether the owner's own requisitions are auto-approved. See Purchasing.
12.17 Client-Facing Embeds
Eight different things in Settings put something in front of your customers, and they are easy to mix up. This is what each one is for.
| Feature | What it is | Reach for it when |
|---|---|---|
| Client Portal | A branded, logged-in area where an existing client sees their own jobs | A customer keeps calling to ask where their countertop is |
| My Website | A public website the app generates for your shop | You have no website at all and want one without hiring anybody |
| Quote Widget | A quote-request form you paste into your own website | You want leads from your site to land in the app as projects at the Lead stage |
| Materials Widget | Your materials catalog, embedded, with search and type/brand filters | Customers ask "what colors do you carry?" before they ever call |
| Website Widget | Your pieces, embedded on your own site | You want your remnant inventory browsable on the site you already have |
| Chat Widget | A live chat bubble you paste into your own website | Visitors have one quick question and will leave rather than fill out a form |
| Room Visualizer | A tool that shows a material in a room, on your free website and embeds | Customers cannot picture a slab from a 4-inch sample |
| Public Screens | Read-only links for the Kanban board or the Calendar | You want a TV on the shop floor showing today's work, with no login on it |
Each is configured under Settings > its own entry. The embeddable ones (Quote, Materials, Website and Chat widgets) hand you a snippet of code to paste into your site's HTML.
Public Screens are public
A public screen link works for anyone who has it, with no login. That is the point — a factory-floor TV should not need someone to sign in every morning — but it also means the link is the only thing protecting what is on it. When you create one, choose the visible fields and, for a Kanban screen, the visible stages deliberately: do not put client names or job values on a screen visitors can see. Treat the link like a key.
12.18 Where Website Leads Come From (for Your Marketing Agency)
Every lead that arrives through the Quote Widget or the Chat Widget records where the visitor came from, so you (or the agency running your ads) can tell which campaign paid off:
- UTM tags on the link the visitor clicked (
utm_source,utm_medium,utm_campaign,utm_term,utm_content). - Ad click ids added automatically by the ad platforms:
gclid(Google Ads),fbclid(Facebook / Instagram),msclkid(Microsoft Ads),ttclid(TikTok). - The referrer (the site the visitor came from) and the landing page (the first page they opened on your site).
The first visit wins and is kept for 30 days in the visitor's browser, so a person who clicks an ad on Monday and fills the form on Thursday still counts for that ad. The job then shows a Source line in its description (for example google / cpc / kitchen-remodel, Google Ads, Referral: houzz.com or Direct), and the New Quote Request e-mail sent to your team carries the same Source row (template variables {{lead_source}} and {{landing_page}} under Settings > Email Templates).
Give the agency a link per campaign
Tell your agency to send ads to your site with UTM tags, e.g. https://yourshop.com/free-quote/?utm_source=google&utm_medium=cpc&utm_campaign=kitchen-remodel. Nothing to configure on our side: the widget picks the tags up on its own.
Counting the form as a conversion
When a visitor submits the quote form, the widget tells the page about it in three ways, so the agency can count it as a conversion in Google Ads, Meta or any other platform:
| Signal | What fires | Who uses it |
|---|---|---|
| Google Tag Manager | dataLayer event stone_quote_request |
A GTM trigger of type Custom Event |
| Google Analytics 4 (gtag.js) | event generate_lead |
Mark it as a key event in GA4, then import it into Google Ads |
| Plain JavaScript | document event stoneproject:quote-submitted |
Any custom script (Meta Pixel fbq('track', 'Lead'), etc.) |
If the agency prefers a thank-you page (the most common way to count conversions), add data-success-url="https://yourshop.com/thank-you/" to the widget's <div id="rf-quote-widget" ...> snippet on your site. After a successful submission the visitor is sent to that page instead of seeing the in-form thank-you message.