3. Managing Your Pieces
List, organize, and track your stone remnants on the marketplace.
3.1 Adding a New Piece
To list a new remnant on the marketplace:
- Tap the + Add Piece button on the Dashboard or from the Catalog screen.
- Fill in the piece details (see fields below).
- Upload at least one photo.
- Tap Publish to make it visible on the marketplace.
Quick-Add Dialogs
When filling in Material Type, Brand, or Color, you can tap the + Add button next to the dropdown to create a new item on the fly — without leaving the form.
Required Fields
| Field | Description |
|---|---|
| Title | Descriptive name for the piece (e.g., "Calacatta Gold Remnant 48x24") |
| Length | Length of the piece |
| Width | Width of the piece |
Optional Fields
| Field | Description |
|---|---|
| Stone Type | Select from the available stone types |
| Category | Choose the appropriate category |
| Material Type | Material classification (e.g., Granite, Quartz) |
| Material Color | Specific brand color (e.g., Calacatta Laza by Caesarstone) |
| Thickness | Slab thickness |
| Price | Sale price for the piece |
| Color | Primary and secondary colors |
| Finish | Surface finish (Polished, Honed, etc.) |
| Origin | Country of origin |
| Description | Detailed description, notes, or special characteristics |
| Stock Quantity | Number of similar pieces available |
| Price Type | Fixed, Negotiable, or On Request |
| Facility | Storage location/warehouse for this piece |
| SKU | Internal stock-keeping unit code |
| Supplier | Supplier or vendor for this piece |
| Shape | Shape type (Rectangle, L-Shape, etc.) |
Brand Color Selection
If you use the Material Type and Material Color fields, Stone Project can match your piece to a specific manufacturer's color catalog (e.g., Silestone, Caesarstone, Cambria). This helps buyers find exactly the material they need.
3.2 Uploading Photos
Good photos significantly increase the chances of selling your remnant.
To upload photos:
- Tap the camera icon or Add Photos area.
- Choose your source:
- Camera — Take a photo directly
- Gallery — Select from your photo library
- You can upload multiple photos per piece.
- Drag to reorder photos; the first photo becomes the primary image.
Photo tips:
- Use natural lighting when possible.
- Include a ruler or measuring tape for scale reference.
- Capture the full piece as well as close-ups of veining, color, and finish.
- Show any defects or imperfections honestly.
3.3 Setting Dimensions & Specifications
Accurate dimensions are critical for buyers:
- Length — The longest side of the piece
- Width — The shorter side of the piece
- Thickness — The depth/height of the slab
Dimensions can be entered in inches or centimeters depending on your unit preference (Settings > Preferences).
Tip: Use the Measurement Tools to capture dimensions precisely using your phone's camera or AR capabilities.
A whole brand imported with the wrong size — do I fix them one by one?
No, and it is probably not this screen. Pieces here are the slabs physically in your inventory. A brand whose catalog entries all carry the wrong slab size — every Vicostone reading something other than 130 × 65, say — is your price list catalog, a different list. Fix it in one go: More > Financial > Price Lists > open the list > Materials tab > tick the colors (or the header checkbox for all of them) > Set slab size. See Fixing many colors at once.
3.4 Pricing Your Pieces
Set competitive prices for your remnants:
| Pricing Type | Description |
|---|---|
| Fixed | A set price for the entire piece |
| Negotiable | Indicates the price is open for negotiation |
| On Request | Buyers must contact you for pricing |
Tip: Check similar pieces on the marketplace to price competitively.
3.5 Editing & Deleting Pieces
Editing
- Go to your Catalog (More > Catalog or Dashboard).
- Tap the piece you want to edit.
- Tap the Edit button.
- Update the desired fields.
- Tap Save.
Deleting
- Go to your Catalog.
- Tap the piece you want to remove.
- Tap the Delete button (or the trash icon).
- Confirm the deletion.
Trash & Recovery
Deleted pieces are moved to the Trash and can be restored within 30 days. To access the Trash, tap the Trash icon on the Catalog or Inventory screen. After 30 days, trashed pieces are permanently removed.
The Trash is not just for pieces
Pieces are one of thirteen record types the Trash keeps. Deleted clients, projects, quotes, orders, invoices, payments, purchase orders, requisitions, vendor bills, tasks, contracts and label templates all land there too, each on its own tab, and each restorable the same way. If someone deleted the wrong thing anywhere in the app, check More > Settings > Trash before assuming it is gone — see Settings > Trash.
3.6 QR Code Labels (Pro)
Generate QR code labels for physical inventory tracking:
- Open a piece's detail page.
- Tap the QR Code icon.
- A unique QR code is generated for that piece.
- Print the QR code and attach it to the physical piece.
- Anyone scanning the QR code with the Stone Project app will be taken directly to the piece's listing.
Thermal Printer Support
For high-volume labeling, Stone Project supports direct printing to thermal label printers. This lets you print QR code labels without a regular printer:
- Go to the QR Code label screen.
- Tap Printer Setup to configure your thermal printer (via IP/network).
- Tap Print to send labels directly to the printer.
Use cases:
- Warehouse inventory management
- Easy piece identification in your yard
- Quick access for customers visiting your shop
- Batch-printing labels for incoming slabs
3.7 Inventory Management
Keep track of your available stock:
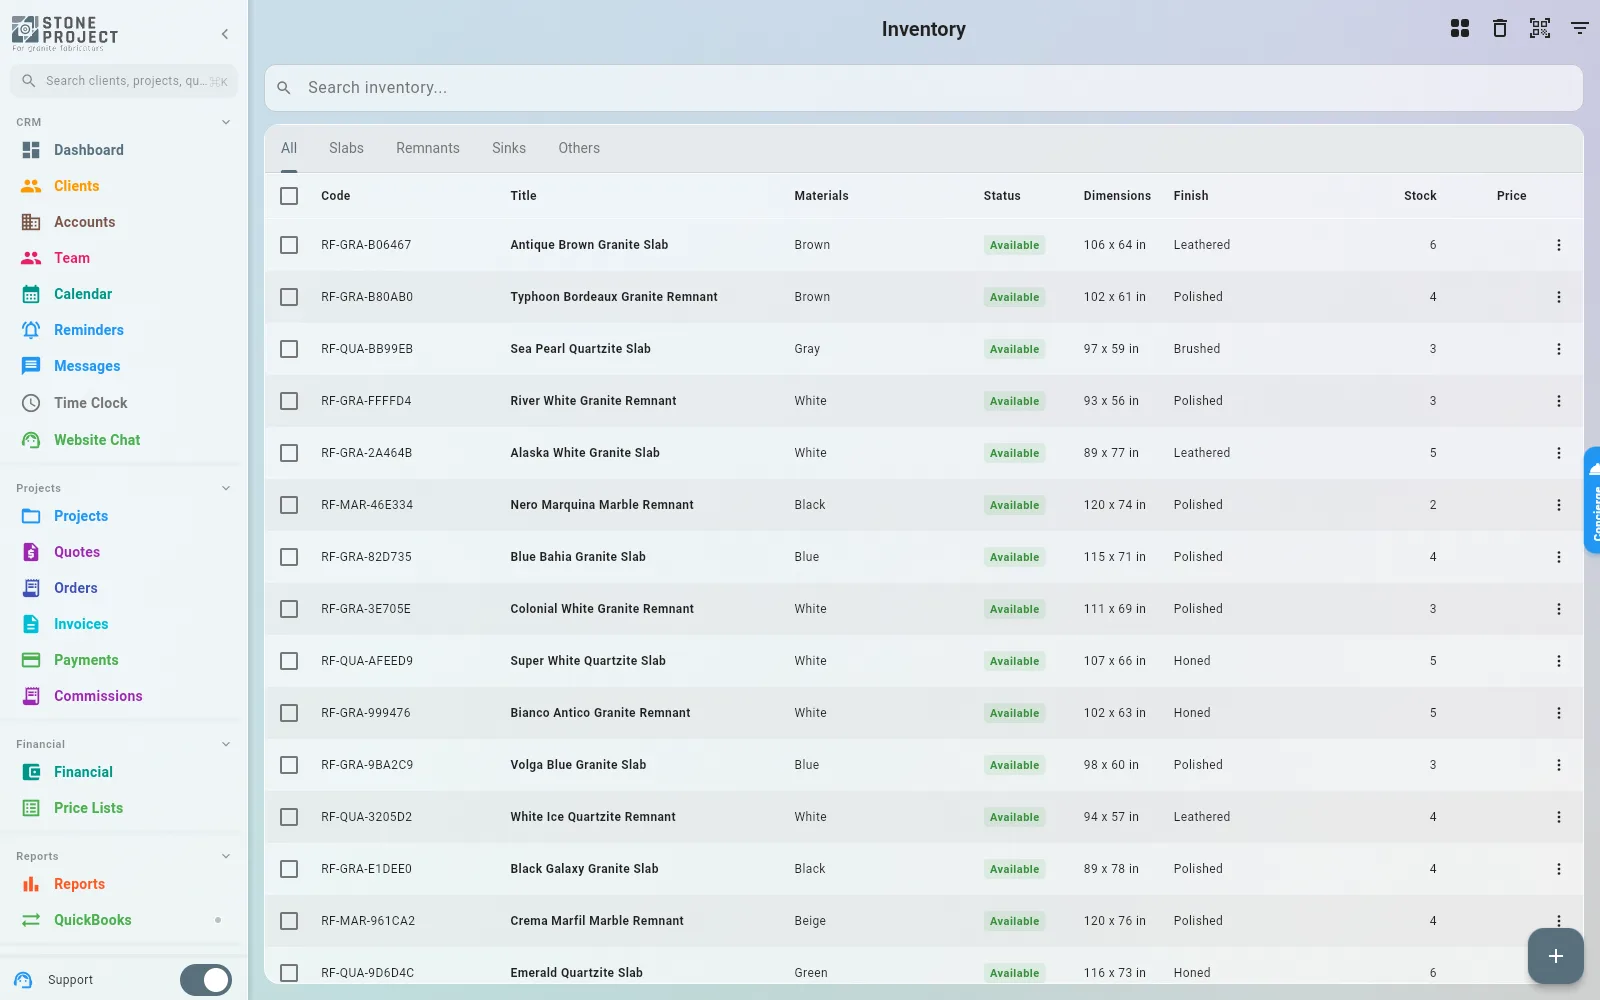
- Available — Piece is visible on the marketplace
- Sold — Mark as sold to remove from active listings
- Reserved — Temporarily hold a piece for a specific buyer
- On Hold — Piece is temporarily unavailable
View inventory summary from More > Inventory or your Dashboard widgets.
Reservations & Holds
When you reserve a piece for a specific project or buyer:
- Open the piece and tap Reserve.
- Select the client or project (optional).
- Set the quantity to reserve.
- The piece's status updates to show it's partially or fully reserved.
View all reservations from a piece's detail page or from the project it's linked to.
Slab Fulfillment & Inventory Matching (Pro)
Pro Feature
Slab Fulfillment and Inventory Matching require a Pro subscription.
When you have purchase orders or material needs from quotes, Stone Project can help you find matching slabs in your inventory:
- Go to a purchase order or project material requirement.
- Tap Find Matching Inventory.
- The system searches your catalog for slabs that match the required material type, color, and dimensions.
- Review matching results and assign slabs to fulfill the order.
This feature helps reduce waste and ensures you use existing stock before ordering new material.
Facilities & Location Tracking
If your company uses multiple warehouses or yards, you can assign pieces to specific facilities:
- When adding or editing a piece, select the Facility field.
- Choose the storage location.
- Use facility filters on the inventory list to see pieces at a specific location.
See Company Management > Facilities for setup instructions.
Free Plan Limits
On the Free plan, you can list up to 20 pieces. Upgrade to Pro for unlimited listings. A counter on your Catalog screen shows how many listing slots you have remaining.
3.8 Floor Plan Editor (Pro)
Pro Feature
The Floor Plan Editor requires an active Pro subscription.
Visualize your warehouse, showroom, or yard by laying out pieces and racks on an interactive floor plan.
Accessing the Floor Plan
- Go to a Facility detail page (see Company Management > Facilities).
- Tap Floor Plan to open the editor.
Editor Features
| Feature | Description |
|---|---|
| Racks | Add and position storage racks where pieces are stored |
| Drag & Drop Pieces | Drag pieces from the side panel onto racks or floor areas |
| Properties Panel | View and edit properties (dimensions, labels) of the selected item |
| Satellite Background | Toggle a satellite map background for outdoor yards |
| Image Overlay | Upload a floor plan image as a background layer for reference |
| Zoom & Pan | Pinch to zoom; drag to pan the canvas |
| Collision Detection | Pieces snap and avoid overlapping when positioned |
Adding Racks
- Tap the Add Rack button in the toolbar.
- Position the rack on the canvas.
- Set the rack label and dimensions in the Properties panel.
- Drag pieces from the Pieces Panel (side drawer) onto the rack.
Satellite & Map Mode
For outdoor storage yards, enable Satellite Background to see an aerial view of your facility's location. If your facility has GPS coordinates configured, the map automatically centers on the correct spot.
Practical Uses
- Map your entire warehouse layout rack by rack.
- Quickly locate pieces by seeing exactly where they are stored.
- Plan reorganization by dragging pieces between racks.
- Share floor plans with team members for efficient picking.
3.9 My Catalog
My Catalog is the list of your own pieces — everything you have entered, whether or not it is published to the marketplace. Open it from More > Catalog, or from the Dashboard.
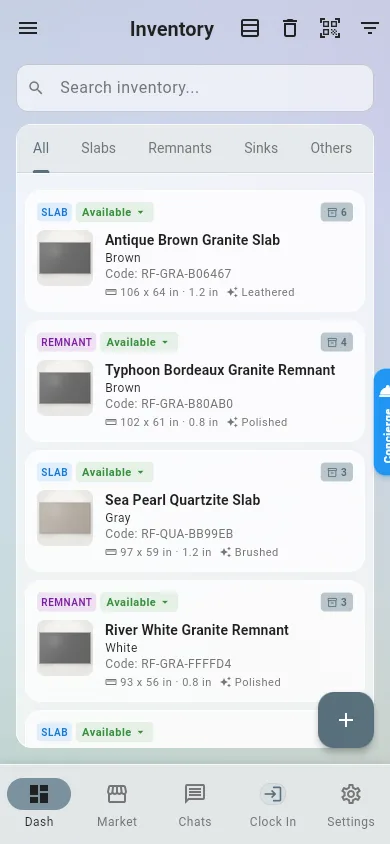
Finding a piece
Tap the search icon in the header and type. The search matches the piece name, code and description, so a fragment of the title, an SKU or a note you wrote in the description will all find it.
Advanced Filters
Tap the sliders icon next to search to open Advanced Filters. A dot on the icon tells you filters are active, and each active filter also shows as a chip above the grid that you can tap to remove.
| Filter | Options |
|---|---|
| Status | All, Available, Reserved, Sold |
| Visibility | Show in marketplace, Hide from marketplace |
| Sort by | Newest, Oldest first, Highest price, Lowest price, Most viewed |
Tap Apply Filters to use them, or Clear to drop them all at once.
The catalog shows marketplace-visible pieces by default
Until you set the Visibility filter to Hide from marketplace, the list shows the pieces that are published. If a piece you know exists is not in the list, it is most likely hidden — switch the filter to find it.
Selecting several pieces at once
- Press and hold any piece card. The piece is selected and the header switches to selection mode.
- Tap additional pieces to add them to the selection, or tap Select All in the header.
- The header shows the running count. Tap the X to leave selection mode without doing anything.
Batch actions
With pieces selected, an action bar appears at the bottom of the screen.
Change Status opens a sheet with these actions, each applied to every selected piece:
| Action | Effect |
|---|---|
| Mark as Available | Sets the status back to Available |
| Mark as Reserved | Sets the status to Reserved |
| Mark as Sold | Sets the status to Sold |
| Hide from Marketplace | Pieces stay in your catalog but are not visible to buyers |
| Show in Marketplace | Pieces become visible to buyers again |
Delete removes every selected piece at once, after a confirmation. Batch-deleted pieces go to the Trash like any other deletion, so a wrong selection is recoverable.
Change the whole slab run in one pass
Received a container and want all of it hidden from the marketplace until it is priced? Filter by Newest, long-press the first piece, Select All, then Hide from Marketplace. When the pricing is done, do the reverse.
3.10 Bulk Purchase — Receiving a Whole Load
When a container or a truckload arrives, entering pieces one at a time is a waste of an afternoon. Bulk Purchase takes one supplier, one location and a list of line items, and creates every piece in a single save.
Open it from the Inventory screen, via the add menu > Bulk Purchase.
1. Supplier & Location
At the top, set what the whole load has in common:
| Field | What it does |
|---|---|
| Supplier | Who you bought from. Carried onto every piece in the load. |
| Facility | The yard or warehouse the material is going into. |
2. Add the line items
Each line item is one kind of material, with a quantity. Tap Add Item for every additional kind.
| Field | Notes |
|---|---|
| Item type | Stone, Sink, Faucet, Cooktop, Accessory or Other. Stone shows the material fields below. |
| Material | Material type, then brand, then color |
| Finish | Polished, Honed, and any finish your company has added |
| Length / Width | In your unit setting (cm or inches) |
| Thickness | Stone only |
| Purchase Price | What you paid per piece, not for the line |
| Qty | How many identical pieces this line represents |
Each line shows its own subtotal (price × quantity), and the summary block shows the total piece count and the total amount for the load.
Let the color fill the line in for you
Picking a material color that already has slab dimensions, thickness and cost in your price list auto-fills Length, Width, Thickness and Purchase Price on that line. Adjust only what is actually different on the slabs that arrived.
3. Post it to Financial (optional)
Turn on Create Accounts Payable and the purchase does not stop at inventory — it becomes a bill you owe.
| Field | What it does |
|---|---|
| Due date | When the supplier expects to be paid. Defaults to 30 days out. |
| Installments | Single payment, or split into 2–12. A preview shows the per-installment amount. |
| Notes | Anything your bookkeeper needs to see on the payable |
You can also attach the invoice, receipt or proof of purchase (JPG, PNG, WEBP or PDF) in the Attachments card. The files are filed against the financial transaction the purchase creates.
Tap Save. Every piece is created, and if you enabled it, the payable shows up in Financial.
3.11 Piece Holds
A hold is a short-term claim on a specific piece: it records who is holding it, why, for what, and until when. Unlike marking a piece Sold, a hold expires on its own.
Open the list from the sidebar: Piece Holds.
What the list shows
Each card carries the piece, the hold type, and a status badge:
| Badge | Meaning |
|---|---|
| Active | The hold is live and has not passed its expiration |
| Expired | The expiration time passed; the piece is effectively free again |
| Released | Somebody let it go on purpose |
Below the badge you see who is holding it, the project it is held for, when it expires, and the reason typed when it was placed.
Use the eye icon in the header to switch between active holds only and the full history.
Hold types
| Type | Placed when |
|---|---|
| Project Hold | The piece is committed to a specific project |
| Quote Hold | The piece is tied up by a quote that has not been accepted yet |
| Manual Hold | Somebody claimed it by hand, for any reason they typed in |
Extending and releasing
On any active hold:
- Extend pushes the expiration out by another 24 hours. You can extend repeatedly.
- Release ends the hold immediately and frees the piece.
One hold per piece
Placing a new hold on a piece automatically releases whatever hold it already had — a piece is never held by two people at once. When a hold ends, by release or by expiration, the piece stops showing a holder and an expiration date, and is available to be committed elsewhere.
Expired holds do not clean themselves out of your day
A hold that has expired stops protecting the piece, but it stays visible in the list until someone acts on it. If your shop runs on holds, make scanning the expired ones part of the morning routine — otherwise a slab everyone believes is spoken for is quietly back in play.
3.12 Photo Analysis
Instead of measuring a remnant by hand and typing the numbers, you can photograph it and let the app read the piece.
Taking the photo
- Start a new piece (or edit one) and open the camera capture.
- Place a reference object on the slab, flat and fully visible. This is what gives the app a real-world scale:
- A credit card
- A sheet of A4 paper
- A ruler
- A coin
- Shoot the whole piece straight-on, with the reference object in frame.
What you get back
The analysis screen shows the photo with the detected outline drawn over it, plus:
| Result | What it tells you |
|---|---|
| Detected shape | Rectangle, L-shape, triangle, circle or irregular, with the number of corners found |
| Estimated dimensions | Length, width and area, in your unit setting |
| Margin of error | A ± percentage on those dimensions — read it before you trust them |
| Color analysis | Dominant color with its hex value, a name, secondary colors, and whether veining was found |
| Suggested stone type | The app's best guess from the color reading |
| Suggested finish | Polished, honed, brushed, flamed, leather, and so on |
A confidence badge sits on the photo:
| Badge | Reading | What to do |
|---|---|---|
| High | 70% and above | Numbers are usable as-is; spot-check the long dimension |
| Medium | 40% to 69% | Verify with a tape before quoting from it |
| Low | Below 40% | Reshoot with better light and a clearer reference object |
Warnings appear in a banner above the results — most commonly that no reference object was found (in which case the measurements are estimates, not measurements) or that the outline could not be read cleanly.
Applying it
Tap Apply Measurements and the app fills the piece form with the length, width, shape and suggested finish, and adds the photo to the piece's images as the first picture. Everything is still editable — the analysis is a first draft, not a lock.
Tap the refresh icon in the header to re-run the analysis on the same photo.
No reference object means no real scale
Without a credit card, sheet of paper, ruler or coin in the frame, the app has nothing to measure against and the dimensions are guesses. It will say so in the warning banner. Never quote a job from an analysis that carries that warning.